
Five hobby projects you can do at home
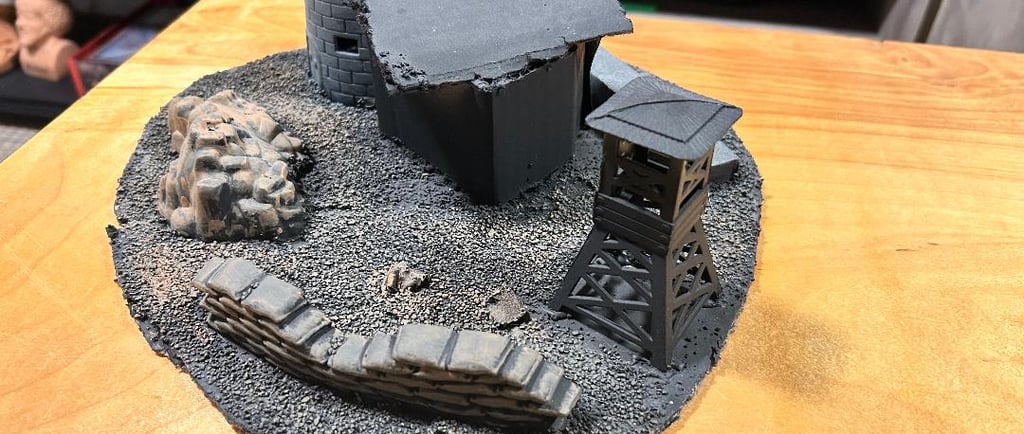
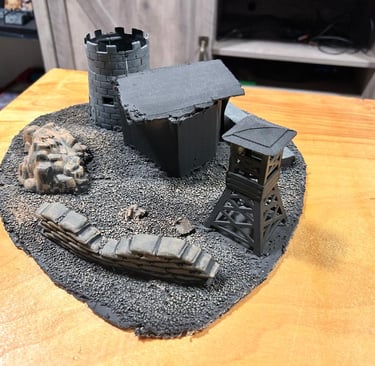
In this article we will cover five simple projects you can do at home to get started in the hobby. I have included a few pictures of terrain pieces Griffin and I built using everyday houhold items.
Shaun Montgomery
9/5/20243 min read
5 Fun and Creative Tabletop Hobby Projects Kids Can Do at Home
Introduction
Tabletop hobbies like miniature painting, model building, and crafting are fantastic ways for kids to develop their creativity, fine motor skills, and patience—all while having fun at home. Whether your child is new to tabletop hobbies or already a budding enthusiast, these five projects are perfect for keeping them engaged. Each project comes with a list of tools and materials needed, making it easy to get started.
1. Miniature Figure Painting
Miniature figure painting is a staple of the tabletop hobby world. This project allows kids to bring their favorite characters or creatures to life with their own unique color schemes.
Tools and Materials Needed:
Miniature figures (plastic, metal, or resin)
Acrylic paints (variety of colors)
Fine detail paintbrushes
Palette (for mixing paints)
Water cup (for cleaning brushes)
Paper towels (for blotting brushes)
Primer (optional, for better paint adhesion)
Sealer/varnish (to protect the finished figure)
Steps:
Prepare the miniature by cleaning and priming it (if necessary).
Plan the color scheme.
Start painting, beginning with larger areas and gradually adding details.
Allow the paint to dry completely before applying a sealer.
2. DIY Terrain Building
Creating terrain pieces adds an extra layer of immersion to tabletop games. Kids can build their own hills, trees, or buildings using simple materials.
Tools and Materials Needed:
Foam board or insulation foam
Craft knife or hobby knife
PVA glue (white glue)
Acrylic paints (earth tones, greens, etc.)
Flock (for grass texture) or sand
Small rocks, twigs, and other natural materials
Cardboard or thick paper (for bases)
Paintbrushes (various sizes)
Steps:
Design the terrain piece and cut out the basic shapes from foam.
Assemble and glue the pieces together on a cardboard base.
Add texture with sand, rocks, or flock using PVA glue.
Paint the terrain using acrylic paints, adding highlights and shadows.
Let everything dry before using the terrain in games.
3. Scratch-Built Cardboard Miniatures
For a budget-friendly project, kids can create their own miniatures using cardboard. This project encourages creativity and problem-solving as they design and build their characters or objects.
Tools and Materials Needed:
Cardboard (from cereal boxes or similar)
Pencil and ruler (for drawing shapes)
Scissors or craft knife
Markers or acrylic paints
Glue (PVA glue or hot glue)
Toothpicks or thin sticks (for supports)
Steps:
Draw the design on cardboard, including front, back, and side views if necessary.
Cut out the shapes carefully.
Assemble the pieces using glue, reinforcing with toothpicks if needed.
Decorate the miniatures with paint or markers.
Allow them to dry before using in a game.
4. Custom Dice Crafting
Dice are essential in many tabletop games. In this project, kids can create custom dice with their own designs or symbols.
Tools and Materials Needed:
Wooden blocks or blank dice (available online or at craft stores)
Acrylic paint or permanent markers
Fine-tipped paintbrushes
Varnish or sealer (optional, for durability)
Steps:
Paint the wooden blocks in a base color of choice.
Once dry, use a fine-tipped brush or marker to add numbers, symbols, or designs to each side.
Allow the dice to dry completely.
Seal the dice with varnish if desired.
5. Model Building Kit
Model building kits are a great way for kids to develop patience and attention to detail. They can choose from various themes, such as vehicles, robots, or historical figures.
Tools and Materials Needed:
Model building kit (plastic model, Gundam, or similar)
Hobby knife or sprue cutters
PVA glue or model cement
Sandpaper or a nail file (for smoothing edges)
Acrylic paints and paintbrushes (optional, for customization)
Tweezers (for handling small parts)
Steps:
Carefully follow the instructions in the model kit to assemble the pieces.
Use the hobby knife or cutters to remove parts from the sprues.
Sand any rough edges before gluing pieces together.
Optionally, paint the model once assembled for a personalized touch.
Allow everything to dry before displaying the model.
Conclusion
My personal favorite to start with is building terrain out of cereal boxes soup cans, soda cans you name it and you can build it from things laying around the house. Easy, fun and a good project for those rainy, or snowy days around the house. Bonus you get to play with them after your done!